Adding lights to your structures (continued)
By John Underhill (from MR Magazine website)
 The best time to install interior lighting is while the building is under construction. I install the bulbs after
I've completed the structure's floor and exterior walls, but before adding the roof. At this point access to the
interior is easy. Lighting can also be installed in a finished building by removing its roof or floor.
The best time to install interior lighting is while the building is under construction. I install the bulbs after
I've completed the structure's floor and exterior walls, but before adding the roof. At this point access to the
interior is easy. Lighting can also be installed in a finished building by removing its roof or floor.Concealing the source
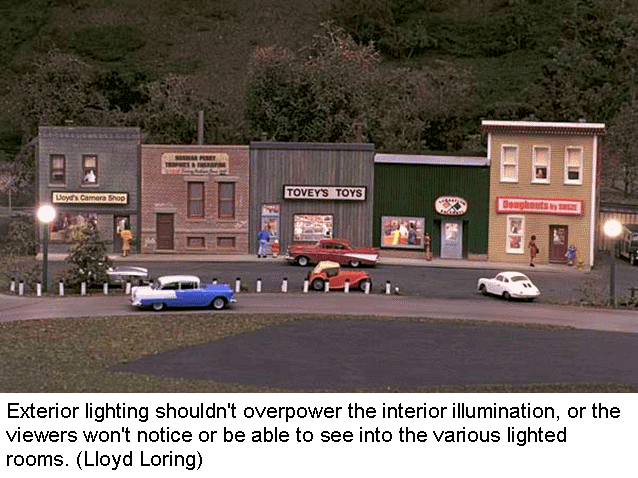
The view into a building is important, because you don't want visitors to see a bright bulb inside. To avoid this problem, I set each building on the layout and mark its exact location so I can return it to the same place.
Look for interior locations where a bulb can be concealed from view. Then check the location by looking into the windows and open doors from every possible viewing angle. I also look at the building from different heights, by bending down or using a stool.
Once satisfied, I mark the hidden bulb locations on the floor of the building. Then I check under the layout to be sure nothing will be damaged when I drill the holes for the wiring.
One room at a time
 For modeling purposes, I call each interior space that will be illuminated a room. This room can be the entire building
or just a portion of it.
I carefully check each room for light leaks at the corners, ceiling and floor joints, and around the window and door frames. Many of my model buildings didn't include floors, so I made my own from wood or styrene sheet.
To check for light leaks, I use a flashlight or a 12-volt bulb with 18" wire leads connected to a power pack. The long lead wires let me slip the lamp inside the structure so I can easily check all the joints.
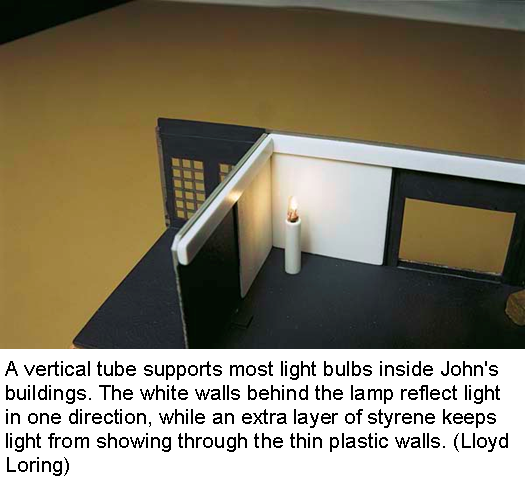
This is also a good time to check the walls. Some building walls are so thin that light shows through. If this happens, I either paint the interior walls flat black or add another layer of material to make them thicker.
If a building has several rooms, I give the same attention to all the walls and joints to avoid any light.
Beware of light on the sky
Sometimes the light from a window will fall on the backdrop. Raising or relocating the bulb will often solve the problem. I've also had to close a few windows by covering their openings from the inside with wood or styrene painted flat black on both sides.
Windows that face away from the viewer can be used to produce a handy footlight effect. I cut an opening in the back of the building and install a bulb inside that will illuminate the area behind the building. If necessary, I add a false wall to mask the bulb from the balance of the interior. [Evergreen sells black styrene sheet that's perfect for this job. - Ed.] In this case, I'm careful to ensure that the additional exterior light doesn't show on the backdrop.
Replaceable bulbs
It's desirable to be able to replace a bulb without having to take a building from the layout or lift off its roof. To keep the bulbs accessible, I mount them on vertical lengths of Plastruct no. 228 3/16" styrene tubing. Each removable tube passes through the layout and the building's floors to support a bulb at the correct height.
Using my bulb location mark, I drill a 3/16"-diameter hole through the floor of the building. Then I reposition the building on the layout and use the 3/16"-diameter hole in the floor to locate a ¼"-diameter hole through the layout.
To determine the length of the tubing, I measure the lamp's elevation inside the building, add the layout's thickness, and add about ¼" to provide room to tape the lamp's wires to the tube.
After measuring the tube's length, I record it beneath the building on the underside of the layout. I also include the name of the building and the length of the tube near the spot where the tube comes through the layout. Remember, the bulb must pass completely through the tube and protrude ½" beyond its end to ensure full illumination and avoid overheating. Then I cement the tube into the floor of the building.
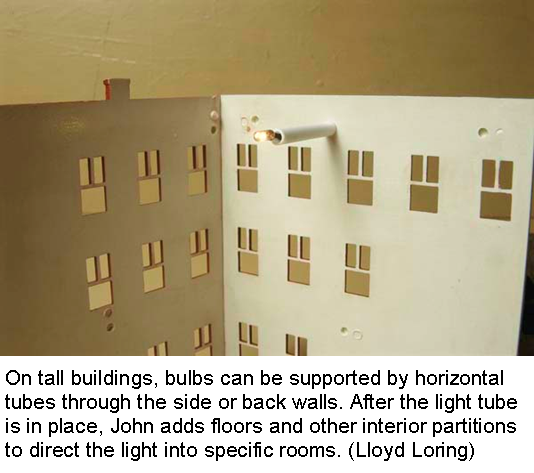
To light the upper floors of my taller buildings, I use horizontal instead of vertical tubes. They enter the tall buildings from the back where they're out of sight, as shown in the picture below.
 As before, the bulb should protrude about ½" beyond the end of the tube. The wires from the bulb are run down the rear wall
of the building.
With all of my bulb leads exiting under the layout, I connect all the wires to Radio Shack no. 274680 terminal strips with screw terminals.
Most of my light bulbs are Micro-Mark no. 82590 C grain-of-wheat bulbs, 12- or 14-volt 1/8"-diameter bulbs, or Miniatronics no. 1801420 2.4mm, 14-volt lamps. The wires on these light bulbs are long enough and stiff enough for the bulbs to be easily pushed up through the tubing and to be held in position.
Other manufacturers offer lamps in a variety of colors, sizes, and voltages that can be used for all sorts of special effects. In addition, light-emitting diodes offer even more options. All it takes is a bit of imagination and some ingenuity to add your own realistic lighting effects.
