
Merit-Award Winning Cars
by David Halpern, MMR
Editors note: This article continues the discussion on building award winning model cars.
For merit award or contest judging, models are evaluated on the basis of construction, detail, conformity, finish, lettering, and scratchbuilding. It takes 87.5 of the 125 available judging points to win a merit award. Having served as my region's AP Manager, I know from the mail I received and the comments made directly to me at contests and meetings that the prospect of having to vie for merit points is intimidating to many modelers, including some very good ones. It can be particularly forbidding to those who prefer to build from kits. Without scratchbuilding at least a portion of any model, these modelers must earn all their points from a total of only 100, inasmuch as they will not be eligible for any of the 15 points allocated to the evaluation of "scratchmanship." So let's see if we can help some of you overcome your fears of being judged, and we'll do it by pointing out some of the areas of car-building that deserve attention and by helping you understand how judges look at models.
To begin with, please remember that when you submit a model of any kind for merit judging, you should never assume that the judges will know the prototype, or that they will understand what you did, or why you did it. Especially when the model is a freelance version, you need to offer a rationale for its existence. If you have pictures of the prototype, or drawings that you can "lend" to the judges for reference, attach them to the judging form. At least write (legibly) supporting statements to attach to the judging form and please keep your notes to the point and as brief as possible.
Some modelers write long essays that consume far too much of the judges' time without providing an equal volume of illumination. I concede that I have been guilty of this myself, and once, when I entered three similar cars in a contest, the judges candidly told me that they had read one of my "term papers" and ignored the other two, figuring - since the cars were similar - that there wouldn't be that much difference between the documents. In fact, there were significant differences, because I had used the three cars to experiment with methods of construction, scratchbuilding and detailing. (Fortunately, I earned the required points on all three models, but the difference between the scores was miniscule and my excessive verbiage cost me bonus points for extra fabrication work.) I learned my lesson.
It will help you to understand and be considerate of the merit judges if you remember that they are themselves merit award-winning, and often contest-winning, modelers. If you tell them the materials you used or that you made jigs, molds or patterns, they will understand the terminology. They may not know the specific difference between a hopper manufactured by ACF for the L&N Railroad and another one made for Burlington, or that your specific prototype modified the car you are modeling in their own shops to fit an unusual application. That is the kind of support information they need from you if they're going to evaluate you properly on conformity and detail.
I was very timid about entering cars in contests for a long time. I was cured of my timidity when my first entry earned 103 points and second place at a regional convention, but I really struggled with that one. I knew the judges were tough, so I planned ahead and built an HO scale 36 foot wood boxcar almost entirely from scratch. I didn't go so far as abandoning scribed siding for individual board construction (though I've done that since), but I sheathed the box (inside horizontally and outside vertically), built my own doors and the channels in which they operated, formed my own steps and grabirons, reworked some old metal queen post castings, made my own bolsters, installed full brake rigging using only one reworked commercial casting that was drilled to accept all the required piping, and disassembled the trucks to clean up the castings. I also researched old construction drawings so that my frame details and all safety appliances would be true to the prototype.
I made sure the construction details were clean and neat. No glue showed anywhere. All joints were tight, grabirons were straight and there was no 'fuzz' on any of the boards. It was very important to me that all of the truss rods were evenly aligned for appearance. I painted the model very carefully, applied dry transfer lettering (which I prefer to decals on wood) with attention to spacing, and weathered the finished car moderately.
I was very careful with the attachment of the trucks to the bolsters to ensure the car would ride level and naturally, I made sure the truck truss rods would not foul the trucks when the car negotiated a short radius. This may seem an obvious, essential point to many of you, but I have judged a lot of contests, and you might be amazed to find out how many modelers are not attentive to this detail.
Please note that the AP requirements for Master Builder-Cars state that the applicant must build "operable" scale models. Once, I almost granted a merit award to a really fine-looking model car that not only wouldn't negotiate a reasonable radius, it wouldn't even roll. I discovered the problem when I lifted the model to examine the truss-rod detail.
Many judges are reluctant to lift a model from the contest table to examine it closely (sometimes they're specifically instructed not to). They never know when or if a part will fall off, and accidents do happen. But when you've gone to the trouble to build a car with a lot of good underbody detail, you want to be sure this is seen by the judges. One way to ensure that the judges will be attentive to your work is to make a note on the judging form explaining that the model may be lifted for inspection.
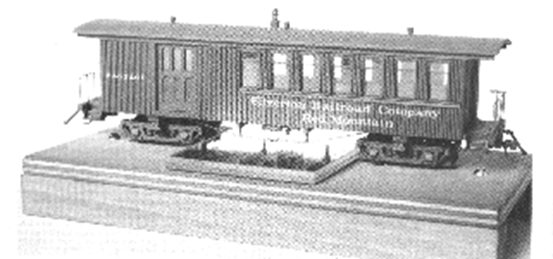 Bruce Nall's award winning passenger car is displayed on a stand that includes a mirror to allow judges to examine the underbody
details without lifting the model.
Bruce Nall's award winning passenger car is displayed on a stand that includes a mirror to allow judges to examine the underbody
details without lifting the model.
My 36-foot boxcar was displayed on a small piece of mirror that I had cut to size by a local glass dealer. It was inexpensive, and I have since had a number of pieces cut for displaying different size models.
I am a strong believer in being my own harshest critic. I figure that if I am not self-critical, I'm going to get a double dose from someone else. And frankly, I'm not sure I would have given my boxcar 103 points. I've included a picture of it with this artide so you can judge it for yourself, but first, listen to my own criticisms. (Ignore the coupler size, please; I built it to run on my layout where Kadee is standard.)
The glaring fault is with the doors. The channels on which they slide are out of scale, and I should have installed more hardware. The truss rod turnbuckles are a bit larger than would be prototypical, and look at the space between the roof and roofwalk. I don't especially like the way the weathering looks in this photograph, but I went into the layout room to check it out a while ago, and it looks a lot better on the actual model. My friends who are Santa Fe buffs may take me to task for not adequately researching the car markings and logo style, and I confess that I did not consider their sometimes fragile sensibilities. I apologize.
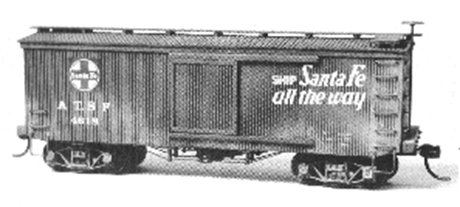 The Author's HO scale scratchbuilt model of a 36-foot boxcar was his first car entered in an NMRA contest. It won a merit award and
second place, helping him to overcome his reluctance to enter contests.
The Author's HO scale scratchbuilt model of a 36-foot boxcar was his first car entered in an NMRA contest. It won a merit award and
second place, helping him to overcome his reluctance to enter contests.
Indeed, this model has its flaws, but it did earn a merit award and, even more importantly, I learned something from building it. I had fun building it, and it helped me overcome my reluctance to enter contests. As a result of my work, I produced a car that operates extremely well - better than many kit-built models. Let's turn our attention now to building and super detailing models from kits. (to be continued.....)