
Merit-Award Winning Cars
by David Halpern, MMR
Editors note: This article continues (and concludes) the discussion on building award- winning model railroad cars.
It's pretty hard to do with plastic models and it's very difficult to do with streamline modern passenger cars. Judges evaluate construction, in part, by the complexity of the model or the difficulty they perceive in building it. Heavyweight and old-time passenger cars, maintenance-of-way equipment, and cabooses are perceived as requiring more effort, and that may be true when the model is built from a kit. Such an assumption is not usually made when the model is scratchbuilt. The addition - or refinement of detail parts can improve the appearance of any kit model I've ever seen. And when you attend to these, you have opportunities to earn extra detail points and to try your hand at scratch building various components.
If your kit is made of plastic, began looking at the possibilities by examining the cast-on details. You may be able to substantially improve the car's appearance by grinding off the cast features and replacing them with parts you fabricate yourself. Very effective and accurately scaled grab irons, steps and railings can be made in all of the larger scales (HO and larger), and hinges, latches, corner straps, stake pockets, valves and other small parts may be improved with scratchbuilt replacements or commercially available detail parts. You might also consider scratch building a load for open cars, or an interior for a boxcar with a door open to reveal it.
Ladders are a detail that can be improved on virtually any kit. Much "ladder stock," particularly in HO scale, tends to be relatively crude and over scale. Fortunately for those who are not scratch builders, there is a wealth of replacement details available commercially. And take a careful look at the brake wheel; sometimes you can replace the ones that come with your kit with wheels that have better detail or ones that are more accurately scaled.
In S, O, G and larger scale, it is especially important to model as much prototypical detail as you can, because the absence of detail becomes increasingly obvious as models become larger and every part and its texture becomes more visible. Couplers, glad hands, uncoupling levers, underbody piping, brake cylinders, brake levers, chains, hangers, and even brake shoes, are all interesting features that are not essential on an operating model, but they significantly enhance the appearance of a contest entry and improve its merit score potential. On passenger equipment, such details as air reservoirs, brake components, generators, air conditioners, battery and tool boxes, air vents, radio antennae, and roofing fabric can make tremendous improvements in the appearance and authenticity of the model.
Up to this point, I haven't mentioned interior detailing, but this is a good way to improve any passenger car, maintenance-of-way or caboose model. Seating, Lighting, partitions, ceiling details, window shades and curtains, dining car and kitchen details, RPO details and the like significantly increase your point-earning potential and really add interest to your model's appearance. Most modelers who add interior details show their handiwork by making the roof of the model removable for display. This requires care to ensure a good fit between roof, car sides and the ends.
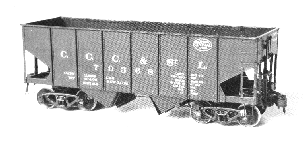 Jim Tangney's scratchbuilt HO scale 55-ton hopper won a first place award at the NMRA national convention. This model built of brass features fine
scale detailing, operating doors and latches, operating journal box covers, and a brake system that operates completely from the handbrake and cylinder
down to the brake shoes at each wheel.
Jim Tangney's scratchbuilt HO scale 55-ton hopper won a first place award at the NMRA national convention. This model built of brass features fine
scale detailing, operating doors and latches, operating journal box covers, and a brake system that operates completely from the handbrake and cylinder
down to the brake shoes at each wheel.
Anytime you can create scale details that operate - like hopper doors, ice hatches, hinges or brake systems you will improve your scoring chances. The accompanying photograph of Jim Tangney's 55-ton hopper is a fine example of this point.
And remember that no matter how much detail you put on a model, it only works to your advantage when it is a good, clean, accurately applied and accurately scaled detail. It can never be viewed as a substitute for quality construction. When a merit judge evaluates your model for detail and conformity, he/she does check the accuracy and quantity of detail, but if your work isn't clean, he/she may deduct as many points from the construction category as he/she adds under detail. You may earn little or nothing for your effort.
And speaking of basic construction, don't overlook kit bashing or kit-mingling opportunities. You can combine parts from different kits to produce a model for which no one kit is readily available. You can modify a kit to produce a special model that reflects a specific railroad's modifications. And you can produce a conversation piece for your personal railroad that serves a "unique" function. If you intend to enter the latter example in a contest, however, remember the conformity category. The judges will want to know if what you have done makes sense in prototype practice.
Finally, a few comments on painting, lettering and weathering your models. We all have seen models that were well constructed up to this point and ruined
by uneven or heavy paint applications and thoughtless or sloppy lettering and weathering. Here are some tips:
First, learn how to use an airbrush. Nothing else works as well for finishing a model evenly. Spray paint cans can be used effectively, but the least
expensive external mix airbrush will do a significantly better job. Some modelers are wizards with a brush, but most are not and even the best cannot
match the results obtained with an airbrush.
Mix your paint carefully so that it is thin but opaque and sprays without excessive air pressure. Don't use the "brush" too close to the surface of the
model, or the application may be too heavy and will run. If you spray from too great a distance, the paint may begin to dry before it bonds to the model's
surface. This produces a stippled or lightly textured result that competes with small details like rivets.
The application of lettering must be done with care to keep it straight and to space it evenly. I realize that the prototype often did not space letters evenly, especially on ribbed-on-outside braced cars, but in recent years, their techniques have improved and modern equipment is generally well done with considerable attention to esthetics. Uneven lettering is even more distracting on a model simply because it is a model. You look at a model differently than you look at the prototype.
Dry transfers are burnished onto a model so that no "film" remains around the individual letters or logos, but decals are another matter. Even with careful trimming, there tends to be some relief that makes a decal more noticeable, unless the modeler exercises great care in applying final coats of lacquer.
After your decals are in place, "snuggled" down and thoroughly dry, they will still be noticeable because of their thickness and the contrast between their glossy appearance and the finish of the surface around them. This difference can't simply be hidden under a dulling spray. First you must spray the entire model with a clear glossy lacquer to make all the surfaces match. After that spray dries, a coat of a dulling lacquer will do a much better job of hiding the decals. I said earlier that I prefer dry transfers on wood, and the preceding paragraph helps explain why. I don't like to hide the texture of wood - even painted wood - under lacquers.
When you weather, approach the process cautiously. Of course, you don't have to weather your model at all, but understand that even a car that is recently out of the shops will have some dust on it. Weathering is always appropriate, but you need to understand how much is enough and where to apply it.
Your best reference is the prototype. If you don't have photographs of your own, look at those in the magazines (don't look at model photographs alone. Even those you may think are great will be overdone.)
Notice how road dust comes up from the bottom and often indicates the direction in which the car has been moving. The ends can reveal spattering from the wheels of the car just ahead. Streaks may run down the side from the roof. There may be dirt or grease around the grabs and ladders. The logo and car markings may be faded from age and exposure to weather and the sun. Dirt tends to accumulate on the roof and tank tops, end sills and door hardware. And, of course, don't forget the truck side frames and the wheels. Only the wheel tread is shiny where it is polished against the rail.
When you try to produce the effect of oil spills around the dome of a tank car, remember proper scale. Modelers often use thick paint to achieve this effect and apply it so heavily that the thickness is distracting.
The key to weathering is to use a light touch. Apply your medium sparingly, whether it's chalk, drybrush, airbrush paints, sandblast or chemical bleaching. Often less is more.
A final word about merit judging, contests, goals and balance.
I'm always cautious, when discussing merit judging, to avoid overemphasizing the competitive aspect of model building. Many of us who participate in the AP do so out of a desire to compete only with ourselves - to improve over our own past efforts and not to accumulate trophies. The significant hurdle is the 87.5 point "barrier" that must be overcome to earn the merit awards needed for AP certification on the road to becoming a "master" of anything.
Moreover, the modeler who builds for his operation-oriented railroad knows the value of compromise and the process whereby the builder believes a satisfying overall effect in his or her modeling. To such a person, an attempt to make every piece of rolling stock a contest-winning museum piece seems impractical, for the time required in building would be an enormous imposition on the time that could be devoted to the satisfaction of operating. And so, to fulfill one's desire to achieve MMR status, this individual does what's required to earn the Master Builder-Cars certificate, content to set one's own car-building parameters. You build a model that looks good, operates well and exhibits obvious craftsmanship, but stops short of what may be required to win a contest at the regional or national level.
Good luck in your effort!